A week after getting the lovely local cream, I still had a jar (almost a pound) of the stuff sitting in my fridge. I had already made panna cotta with it, and wanted to encapsulate the remaining cream in a form that would do it justice. I thought about making a whipped cream cake that uses all cream rather than butter, but it came to me that it's the perfect occasion for making crème brûlée.
Despite its French name, legend has it that crème brûlée is in fact of English origin. According to James Beard, before the Gallicization of its name, it was known as burnt cream for a long time in England. One of the earliest recipes of 'burnt cream' was from a 17th-century cookbook from Dorsetshire. It was a mixture of sugar, egg yolks and cream cooked over heat - just like how creme anglaise is prepared - then poured into a dish and cooled (a few chefs like Simon Hopkinson still prepare the dish this way). The top was then sprinkled with sugar and the sugar caramelised to a brown glaze with a red-hot salamander, and old type of heavy metal tool which was lowered to the surface of the sugar and moved over it until the intense heat melted and browned the sugar, hence the name burnt cream. It subsequently became a standard dessert at Cambridge University, especially Christ College. ("Creme Brulee: Dessert One of the Greatest," James A. Beard, Los Angeles Times, November 5, 1970.)
Like so many other great dishes, the allure of crème brûlée consists in its textural combination of crispiness and creaminess. This combination can be found across the board: roast suckling pig, with its crackled skin and the melting fat lying underneath; ice cream served with a dainty tuile or with a chocolate sauce that hardens to a crisp layer; tarts and quiches, cream puffs, etc. It is possibly the most endearing textural combination known to humankind, and I feel that western plated desserts are largely created with this principle in mind.
Given its universal appeal, crème brûlée is found in restaurant menus all over the world, even though most incarnations you find are but half-hearted attempts. When properly done, using the best ingredients, crème brûlée is truly one of the world's greatest puddings. The best I've ever had the fortune of having was at a local family restaurant in Tours, the Loire Valley in France. For a 15€ three-course dinner, I had the most incredible 'napoleon' with a herbed escargot filling as starter. The puff pastry was so wondrously flaky and light that it just shattered like thin air in my mouth. Main course was pan-fried scallops with a sauce akin to beurre blanc. But the dessert! It was a plain crème brûlée so eggy, with such clarity of flavour, along with an incredibly silken texture, that was pure perfection. Crucially, it wasn't the kind of foul egginess that most people dread. It was a flavour at once bold and pure. Sheer bliss. It was the best crème brûlée and one of the best things I've ever put into my mouth. My friend who accompanied me that dinner returned to the restaurant a few years later, and I was told that the crème brûlée remained as glorious as we remembered.
Crème brûlée can be flavoured with many different things, with vanilla being the most common of all. I also love tea-flavoured versions but there's something very special about the classic crème brûlée, pure and simple. Like so many other great dishes, it showcases all that is best in a handful of ingredients, and all you need to do is to let the exemplary ingredients shine through. Even though I had some very decent cream this time, I only had generic supermarket eggs on hand. Try to lay your hands on free-range or, better still, farm-fresh eggs if you can. It will make all the difference.
Crème brûlée
500ml cream (this can be all double/whipping cream, or a mixture of cream and milk, but don't let your dietary obsessions convince you to use more milk than cream, please. If you're up for it, use all cream. My cream was very thick, so I used 400ml cream and 100ml whole milk this time)
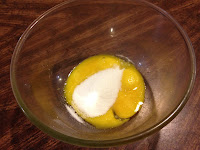
6 egg yolks
30g sugar
Pinch of salt (this is important since there's plenty of sweetness in the brûléed topping so you'd need some salt in the cream underneath to balance it out)
Six 120-ml ramekins
1. Set a rack in the bottom third of the oven and preheat to 180C - if you placed it in the centre of the oven the top of the custards may be overcooked. Prepare a large baking dish that can accommodate the individual ramekins.
2. Scald the cream in a saucepan. Be careful not to do it on too high a heat or it will overflow when it boils.. Set aside.
3. Put the yolks, sugar and salt in a big bowl, mix well with a wire whisk till smooth.
4. Pour in the hot cream over the yolks, whisking all the time.
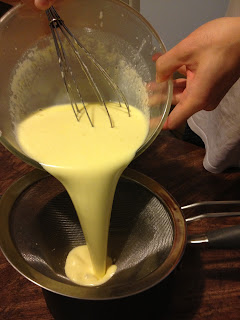
5. Pass the mixture through a fine sieve so that it's absolutely smooth.
6. Place the ramekins or bowls in the larger baking pan that you prepared. Pour the mixture evenly into the ramekins. I like to use a funnel for this, but you can patiently spoon the mixture into the ramekins too. (I broke two of my six-piece ramekins, so had to resort to two rice bowls. Hardly ideal!)
7. Place the tray of filled ramekins onto the oven rack, and pour enough hot water (either from the tap or the kettle) to come halfway up the mixture. Don't burn yourself!
8. Immediately shut the oven door and turn the temperature down to 150C. Check after 30 minutes to see if these little custards are done. They should have a very slight wobble in the centre when shaken gently. Take them out if they're done. If not, leave them in the oven and check again every 5 minutes. Remove the ramekins from the water-bath.
9. This is optional, but here's a tip I learnt from the venerable pastry blog Joe Pastry: sprinkle an initial layer of sugar onto the custards as soon as they came out of the oven (i.e. now!). This way, that sugar would melt and fill in the little pits or uneven bits on the surface. After chilling and putting another layer of sugar on top to brûlée, you would have a perfectly smooth, glass-like layer of caramelised sugar.
10. Let the custards cool to room temperature, then chill in the fridge for at least a couple of hours till thoroughly cold.
11. Now onto the brûléeing that makes serving crème brûlée such a theatrical experience for your guests. See the video below to see how I went about it, but here's the rationale.
Granulated sugar is the handiest since it melts easily into a glass-like layer after burning, but the flavour is kind of flat. Demerara or turbinado sugar gives a more robust flavour and some nice extra crunch, but you would have to burn the top for a little longer so that it caramelises evenly.
Start off by sprinkling sugar evenly over the top. For a 120ml ramekin, one tablespoon and a half tablespoons of sugar should suffice. Tilt the ramekins with one hand and tap gently with the other hand so that the sugar evens out in a layer. Now, turn on your blowtorch and move it slowly across the surface of the custard. Be patient with this and only leave the spot when it almost starts to burn. Continue until you have burnt the entire surface.
The brûléeing is done now if you are using granulated sugar. If you are using demerara or turbinado sugar, you will see that there're still uncaramelised sugar particles underneath the surface. For a more thorough caramelisation, start waiving your blowtorch at a quicker pace than you did so that you raise the overall temperature of a larger area rather than focusing on a tiny spot. Again, cover the entire surface, and you'll be going back and forth on the surface. You should see a glass-like appearance when all is done.
Resist the urge to dive in immediately, and wait for at least a minute or two for the caramel layer to cool and harden before serving. No accompaniments are necessary, I think.
I don't know what happened to my voice at the end of the video. Maybe I was too nervous making my first video and forgot to breathe. Oh well!


No comments:
Post a Comment